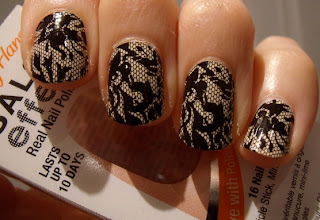
I had doubts about if they would work or not, if they would just look like cheap stickers stuck onto my nails, or even if they didn't fit my nails at all.
I needn't have worried, and I've been cursing myself for taking so long to try them.
Look at these beauties.... aren't they just stunning? I'm in love with my own nails!
 |
| Sally Hansen Nail Polish Strips - 360 Laced Up |
I admit, it took me a good 10 minutes to get into the swing of applying them, and then I was away. The left hand took my much longer than the right surprisingly, and there are a few creases but thankfully the pattern makes it almost impossible to see them. The nails on my right hand are much smoother thanks to the fact that I'd finally got the hang of smoothing the strip onto the nail properly. The trickiest part was lining up the strip to the cuticle so that both sides were even and the strip wasn't wonky.
In the box you get 16 real nail polish strips of 8 different sizes so you can best match your own nail shape. You know that these are pure nail polish from the classic lacquer smell which wafts out of the box when you open it. It really is amazing how they've managed to make these...
You also get a mini file and an orange stick to help with the application.
You simply buff the clean nail, match the correct strip size to your nail, peel off the backing and smooth on, stretching the strip slightly to eliminate creases (this I only learned to do by the time I got to the right hand)!
 |
| Nail polish strip application |
No base or top coat is required, but I have a feeling that a top coat might have prolonged my manicure.
It's supposed to last up to 10 days, but sadly mine began to chip on the second day, probably due to the fact that I'm not a lady of leisure and am always active in the kitchen chopping something or washing veggies.... still I had hoped that it would have lasted a little longer.
Even with the chipping this was still wearable up until today, so that's about 4 days really. The pattern means that small chips aren't that noticeable. If this were a block colour it would have looked pretty horrendous by now.
Despite it's poor staying power, I just love the intricate black lace look you get from these, it looks like I've spent hours painting my nails with a micro-fine brush. The shine is gorgeous and you don't need a top coat, except perhaps for longevity as I said before.
These strips are a bit hard to come by in Europe and the UK. I found them online at Amazon here, but I don't see this particular design.
In the USA of course they are pretty much in every drugstore. I can't remember how much I paid for them, but it something in the region of $8, so much more reasonable than the £9.29 on Amazon. It may seem a lot for just one use, but you can pay up to three times that for a salon manicure which may only last a few days, and I think these are something just a bit more special.
So I guess what I want to say is that I do in fact think they are worth it, well, the ones with the intricate designs that is, I would forgo the plain colours myself.
What do you think of these? Yay or nay?


Aaaaw, I LOVE them!!!!
ReplyDeleteI want them too!!!:)