Musings of a self-confessed beauty addict from the heart of London!

Saturday, 19 November 2011

NOTD - Hello Kitty 'Violet Salome'

Hello Kitty - Violet Salome

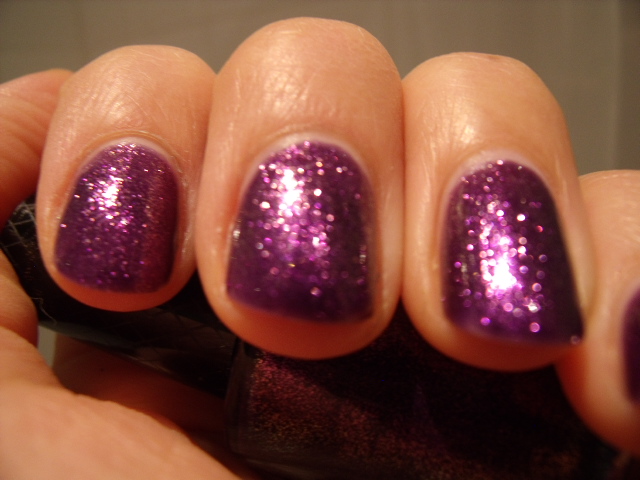
I thought the weekend would be a good time to dig out this little gem by Hello Kitty. I picked this up a few weeks ago and hadn't had the chance to showcase it's juicy gorgeousness yet. For more on Hello Kitty (yes, it's a brand and not a collection) see this post.


I couldn't resist the magical molten elixir contained within the cutesy bottle. Plus, it's called Violet Salome, a suitably lascivious name for such a wanton purple glitter! Salome was a very very bad girl after all....


This is two coats with top coat. One coat is a little streaky, but could be wearable if applied with more care. The one coat colour is softer and more lilac.  This polish applies so easily and the brush is neither too wide or too slim. As with the other Hello Kitty polish I have the texture is on the watery side but this does not pose a problem with either application or wear time. These polishes dry relatively quickly too.


I've included lots of pictures with this one. It's so pretty.... kind of a hybrid between a foil, a glitter and a frost. The glitter is very fine and leans more fuschia pink. The base is purple so the overall effect is quite complex. It's like Cadbury's on acid! 

Blurry photo to show the sparkle....


By the way, you can click on the photos to enlarge them.... (just in case you didn't know!)


I hope to get a little dressed up this weekend to do this justice. Sitting here in my manky old pajamas does not do Violet Salome any favours whatsoever.....

What do you think? Yay or nay?

Friday, 18 November 2011

Lancome Hypnose 'Doll Eyes' Review

Hypnose Doll Eyes
You know those dolls that close their eyes when you lie them flat? They have great lashes.... long, shiny, glossy, thick and black. In fact most dolls have beautiful lashes, so I can kind of see where Lancome are coming from. They launched a small range of products to make you look pretty wide-eyed and oh-so kawaii (that's Japanese for cute/sweet/darling don't you know).

Before this mascara (which was a lovely birthday present) I was using the original Hypnose mascara which I consider  to be the classic little black dress of the mascara world.


I'm kicking myself for not taking a photo of the original Hypnose wand to compare it to the Doll Eyes one because they are very different. Doll Eyes looks like a little fir tree whilst the original has a regular looking brush which is slightly concave in the centre.

Christmas tree shaped wand.... well, almost.

I'll tell you straight up that I much prefer the original over Doll Eyes, but that's because I want my mascara to do everything at once: lengthen, volumise and curl. Doll Eyes does a lovely job of lengthening but I have to go over the lashes multiple times to get the amount of volume I want. It's not a dramatic mascara, it gives a fluttery, pretty effect and when used on the bottom lashes too you really do look a bit dolly like, but in a good way!

Two issues that may bother some girls are the fact that it is overwhelmingly fragranced with a rose perfume, so sensitive eyes may have a problem with this and it doesn't hold a curl that well. I don't really understand how the unusual brush makes 'doll lashes' compared to any other brush but I'm not a mascara scientist so there probably is a highly technical and ground-breaking reason why this particular wand makes you look like a dolly.

Flutter flutter :)

Overall though, I can't really complain about this mascara because at the end of the day it actually delivers the lashes it promises and I do enjoy using it, but I've had to switch to something more volumising when I want a more defined look in the evenings. Therefore, it's a good daytime option or just a nice option in general if you just want some fluttery definition.

Score: 7/10

Tuesday, 15 November 2011

The Ten Commandments - Foundation for beginners

The first foundation I ever tried was an old jar I found in my mum's make-up bag one day. I was 13 and just started reading Mizz, Just Seventeen and Looks (not to be confused with Look magazine). They were filled with makeover pages. Sweet, puffy faced teenagers were transformed into sleek, sexy starlets ready to be taken to the Odeon to see Kevin Costner in Prince of Thieves by their perfect boyfriends with curtain hair and a leather jacket.

I wanted a makeover so desperately so I asked a friend from school to come over to my house one day so that we could make ourselves beautiful. Cue the contents of my mum's make-up bag and along with it the sad realisation that her abandoned cosmetic relics were no more suitable for her than they would be for me. I figured back then that mum really didn't care for these frivolous things which I so hankered for.

So out came this glass jar of Max Factor cream foundation in a shade called 'Warm Almond'. It was dark. A deep, burnt caramel waxy cream.

Friend: "Are you sure this is the right colour for you?"
Me: "Well, mum and I have the same colour skin" (which is very pale olive FYI)

My friend carefully rubbed the beautifying foundation over my puffy face. I looked at her expectantly with big hopeful eyes as she stood back to admire her work.

Friend: (doubled over in fits of laughter) "You look like me!!"


My friend was Indian.

Thus I learned (humiliatingly) the cardinal rule of colour matching. I later asked mum why she had such a dark foundation. She told me that she just bought it without trying it and didn't seem to care much. To her credit she never wore it so at least she didn't commit the sin of dark brown face, white neck.

The bottom line about foundation is this:

YOU SHOULDN'T BE ABLE TO SEE IT. 

If you can see it sitting on your skin it's not making you look good, it's just making you look caked in make-up. Fair enough if that's the look you're going for, but most women just want to look like they have great skin naturally.  Every day I see so many women with very obvious foundation 'masks' due to the following:

  • Wrong colour (too pale / too dark / too orange)
  • Wrong texture/consistency (too oily / too drying)
  • Foundation not blended (obvious streaking / patchiness)
  • Foundation applied to thickly ( hence 'mask-like' effect)
 My mission? To spread the glosspel. Here are my ten commandments:


  1. Thou shalt not buyeth a foundation without trying it first.
  2. Test not on thy hands. The colour must matcheth thy neck therefore test it there. If it blendeth completely and you cannot see it then the colour be right.  
  3. Sales assistants cannot always be trusted (particularly in Belgium and Italy!). Use thine own eyes to determine if the colour matches or not. 
  4. Though shalt knoweth thy skin. Be it oily, dry, combination, sensitive, thou must select an appropriate formulation. e.g. Dry skins should avoid more drying, matte formulations.
  5. Thou shalt procure testers if at all possible to trial at home. Beg, borrow or steal.
  6. Thou shalt not steal. (Just in case thy took me in the literal sense)
  7. Applyeth thy foundation with a light hand. Less is more. 
  8. Blend, blend, BLEND! So important I sayeth it thrice. Most don't blend enough. Even a slightly too dark/too pale foundation can be rectified by blending in really well. Use thy fingers, a brush, a damp sponge, whatever-eth. 
  9. If thou wish to take photos then thou shalt be aware of SPF. Too much SPF photographs WHITE.
  10. Thou shalt change foundation shade when suntanned. Pale face - Bronzed body: Just say no! 

So there you have it. Basic rules for your base. Now go forth and apply.

:)

Monday, 14 November 2011

NOTD - OPI Dim Sum Plum

I love dim sum. I particularly love going for dim sum with my little brother (Brother P the younger) in Chinatown.

And I would be very very happy indeed to wear this lacquer next time I pick up a steamed prawn & pork dumpling.

I believe it was part of the Hong Kong collection but I found it lurking on its ownsome on the lookfantastic.com website. I was busy putting much needed shampoos and whatnot into my basket and this baby flashed up next to the checkout at only £4 something, which is less than half the price. In it went.

OPI Dim Sum Plum
I know I say I love a lot of polishes, but I really really do love this one. Love at first stroke. I gave a girly little gasp when the first line of vibrant fuschia glazed my little finger and I couldn't stop smiling.

So here are lots of pictures. I need to share this goodness!


OPI Dim Sum Plum

It's quite a thick formulation but not difficult to work with. It was completely opaque in one coat and I could have happily left it at that, but I want this manicure to last me so I gave it two coats. Funnily enough two coats give a deeper but slightly paler colour.

I feel like my nails are be-jewelled with colour. The perfect deep pink for autumn.


Would you be partial to some Dim Sum Plum?

Friday, 11 November 2011

Travel Make-Up Bag - London weekend


Mr P and I are off to London for the weekend, not just for the usual slob around at my parents' house, but also for a swanky night on the town on Saturday night. Finally get the chance to glitz it up a bit so this is a more upgraded version of my usual travel staples.

The bag is an old orange mesh Body Shop one that I've had for yonks but somehow it's always been my bag of choice. The mesh makes it practical and pretty and the size is just about right.


 My Effaclar K and Cicaplast are still my skin carers of choice. The Cicaplast is a must these days as I have a particularly nasty mark on my cheek which needs healing pronto and this accelerates the healing like nothing else. Also included are my Clinique All About Eyes which I've been using for the last 5-6 months or so and my new love, Nuxe Reve de Miel lip balm. Can't. Live. Without.


I picked up this little brush travel case in Muji and it's fab for carting about make-up brushes and keeping them separate from the rest of my make-up bag. Inside are my Real Techniques Detailer brush (for concealer), my MAC 224 brush (for 'airbrushing' concealer), Ecotools blush brush, and an old Body Shop foundation brush.

Eye stuff includes my Shu Uemura lash curlers, Laura Mercier Eye Basics primer, Hypnose Doll Eyes mascara (review to come soon), Kiko Long Lasting Stick shadow, Le Metier de Beaute eye pencil in Sequoia Brown, Benefit Speed Brow, and last (and perhaps least), some individual false lashes by Sephora which I may or may not use. 


Base stuff: Erborian BB cream, still going strong after almost 7 months of constant use, Laura Mercier Secret Camouflage, Garnier Tinted Roll-On for eyes, Collection 2000 Lasting Perfection concealer, and samples of Armani foundation.

Other: Nars Orgasm blush, Armani 400 lipstick (just in case I'm feeling brave and because GG wants me to ;)), and Viva La Juicy mini perfume (because Mr P likes it).


The look I'm going for on Saturday is a simple bronze-y smokey eye (with the Kiko shadow stick), and hot red lips. I have a plethora of lipsticks in my handbag so if the red lips don't work it's not the end of the world.

What are your weekend must-haves?

Tuesday, 8 November 2011

Thinking outside of the box - Lipsticks you never use

Often it's the simplest ideas that rock our worlds. Ok, in terms of this post that's a bit of an overstatement I guess, but this little revelation I've had recently has certainly meant that I can view my entire lipstick stash with new eyes.

So you have one, two, five, ten, maybe more lipsticks that you don't wear much because
a) they're too bright/dark/vampy, or
b) you realised that the colour doesn't suit you or 'do' anything for you.

It's a shame not to use what you've spent your hard-earned cash on and it's a waste of resources just to throw them away. So here's a little tip that could just bring them out of the depths of your make-up bag and onto your dressing table (ooooh, dressing table. Fancy. I don't have one, but someday I will.... )


DON'T APPLY THE LIPSTICK STRAIGHT FROM THE BULLET.
DON'T USE A LIPBRUSH.
These application methods are only for lippies you are happy to wear in their traditional guise.

Instead:

USE YOUR FINGERS. SWIPE OVER THE LIPSTICK AND APPLY TO YOUR LIPS LIKE A BALM. MASSAGE THE COLOUR INTO THE LIPS, BUILDING UP THE COLOUR TO YOUR DESIRED INTENSITY.
You will be so surprised by how the most 'unwearable' of colours can be transformed using this method. As a bonus it totally plumps up the lips too. The colour melts into the lips leaving you looking like you've just bitten into a sacred fruit from the garden of Eden....

That bright red which you loved in the shop and swore you would wear more often (and consequently don't) becomes the prettiest, most natural berry flush.

The deep vampy purple which you bought in a 'power dressing' shopping frenzy will stain your lips with a wash of morello cherry-bitten gorgeousness.

Other 'unsuitable' colours can metamorphose into an altogether more flattering hue. 

Lisa Eldridge also shows you how to wear lipstick 4 ways in her video here. This method is one of them. NB If there is just ONE guru to subscribe to on YouTube then it's her. Just do it, people.

I've taken to wearing all my lipsticks like this recently, not just the bright ones. My favourite 'stain' of the moment is created by Rouge d'Armani in Rouge 400, a glorious vintage true blue-red. It looks fabulous applied neat from the tube which is why I bought it over a month ago but it hasn't had many outings because it's just so striking.


Armani Rouge 400
Oh, and it's the one Megan Fox is wearing here:


When I use my fingers it gives a soft red voluptuous (yes, really!) lip which looks retro and modern/fresh at the same time. (By the way, this lipstick has the best staying power I've ever experienced. I need a full blown make-up remover to get it off if I apply it neat from the tube.)

Don't believe me? Brace yourselves....


Bare lips

A little Rouge 400 'massaged' into lips with finger....
 And just to compare:
Rouge d'Armani - Rouge 400, applied straight from tube

Get the picture? Now get out those abandoned lipsticks and show them some love.

Monday, 7 November 2011

OPI Touring America

OPI Touring America

Yay, I won something! So firstly a huge thank you and massive shout-out to Jessica Beautician who very kindly sent me these gorgeous minis when I won her giveaway competition. Check out Jessica's blog (and videos too) here. She's a doll!

From L-R: My Address is Hollywood, French Quarter for Your Thoughts, A-Taupe of the Space Needle, Honk If You Love OPI
Secondly, I genuinely feel an affinity with the OPI Touring America collection because I first visited the USA this year so I consider it to be my personal road-trip in nail colours. Well, the west coast ones anyhow. So I was extra chuffed to have won these ;)

Size comparison between a regular OPI bottle (15ml) and the minis (3.75ml)

Instead of making you all wait for separate NOTD posts I thought I'd just swatch them all at once and post them here. Plus, I'm impatient and just want to play.

Here we have My Address is Hollywood. Now of all the shades this one would not show its pretty self to the camera. It's pink. A lovely soft yet bright coral pink. In these photos however it's coming out more coral-orange than it really is. Maybe under some lights it gets this way, but believe me when I say it's more candy pink. You can see the lovely shimmer though so it's not a total fail picture wise.

This is two coats, no base or top coat to save time and sanity. Overall, a very pretty and quite unique pink which I have nothing like in my nail collection. Great for all seasons I'd say and I can't wait to rock this with my new beige-bisque coloured winter coat. (Yes, I know, the dry cleaner will become my best friend.... )

OPI My Address is Hollywood


Off came the pink and on went the grey. This is French Quarter For Your Thoughts:

OPI French Quarter For Your Thoughts

I can't decide whether this is a warm grey or a cool grey. I see some brown-taupe undertones to it but I could be wrong. What do you think?
Again, two coats, no top or base coat. Lovely formula, smooth and non streaky. In fact all these, bar the dark one, had easy formulas which means that at a push you could get away with one coat if you wanted. Two coats for me is standard though.


 Grey comes off. Taupe goes on. Meet A-Taupe of the Space Needle.

A-Taupe of the Space Needle
I've been a-top (a-taupe) of the Space Needle, yes I have. I've even eaten there and can recommend the salmon. For me this leans more khaki than taupe, but maybe I just don't actually know what taupe looks like, seeing as there are a squillion incarnations of taupe. All I know is I like taupe. Again I have nothing like this so it's great to have in my stash.


Last, but by no means least.... Honk If You Love OPI.

Honk If You Love OPI
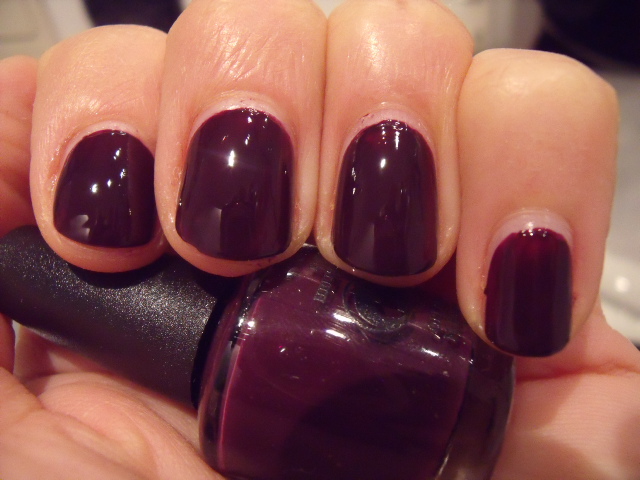
 I'm honking people. Can you hear me? This is pure lurve. Sexy, shiny, vampy, chic, feminine, powerful.... you may continue to add more adjectives. I grant you four photos of this because it is special and you must appreciate its glory. Strangely it has the trickier formula of the four. I needed more polish on the brush to get an even swipe of colour and it's definitely a two-coater. It leaves small 'bald' patches if you look carefully, but I don't care. It's a succulent deep burgundy-grape jelly-cream and it makes my spirits soar to new heights.

I have thus elevated this from meer swatch to NOTD. This is two coats over a base coat and with Essie Good to Go top coat. 

HONK HONK

HONK HONK HONK

If you look carefully you can just about see me in my nails.... :)

Do you like this set? Which colour appeals most?


A final thanks to Jessica for putting  a huge smile on my face (and hands) on this dreary grey Monday!